使用Clash增强模式(Enhanced Mode)实现全局代理 - tlanyan
https://itlanyan.com/v2ray-clients-download/
https://itlanyan.com/download.php?filename=/v2/macos/ClashX-Pro-v1.70.0.2.dmg
------
https://github.com/MetaCubeX/Clash.Meta
----------
clash内核删库?汇总目前常用的内核仓库和客户端
被删的代码仓库
clash for windows 客户端:
https://github.com/Fndroid/clash_for_windows_pkg/releases
clash 内核:
https://github.com/Dreamacro/clash
(其fork version:
GitHub - luckypoem/clash-1: fork from clash )
clash for android 客户端:
https://github.com/Kr328/ClashForAndroid
归档
clash.meta 内核(主分支设置成 rm 分支,官网和群组换成虚空题材):
https://github.com/MetaCubeX/Clash.Meta/
tuic 内核(停止维护):
https://github.com/EAimTY/tuic
clash verge 客户端(主分支设置成 rm 分支):
https://github.com/zzzgydi/clash-verge/
clash for android:
https://github.com/MetaCubeX/ClashMetaForAndroid
健壮内核
v2ray:https://github.com/v2fly/v2ray-core
xray:https://github.com/XTLS/Xray-core
sing-box:https://github.com/SagerNet/sing-box
hysteria(人在国外):https://github.com/apernet/hysteria
还有各类小众内核,例如 naiveproxy,橘子汁等
还能使用哪些客户端
基于 clash 内核的
比如 clash for windows,clash for android 等基于 clash 的客户端大家不能用了,内核已经删库了。
基于 clash.meta 内核的
clash.meta 内核目前来说大概率就是避避风头,我猜测后续还是继续开发的,目前来说基于 meta 的客户端,大家还是可以放心使用。
-
Clash Verge(全平台 - 归档但不影响使用。):https://github.com/zzzgydi/clash-verge
-
clashX.meta(macos):https://github.com/MetaCubeX/ClashX.Meta
-
clash.meta for android(android - 归档但不影响):https://github.com/MetaCubeX/ClashMetaForAndroid
其他
-
v2rayN (人在国外 - windows):https://github.com/2dust/v2rayN
-
sing-box(全平台):https://github.com/SagerNet/sing-box/releases
-
nekoray(windows,linux):https://github.com/MatsuriDayo/nekoray
-
shadowrocket,quanx,stash 等等付费或免费 ios 专用软件
------------------------------------------------------------------------------------------
A Clash GUI based on tauri. Supports Windows, macOS and Linux.
Clash Verge
A Clash GUI based on tauri.
Features
- Full
clashconfig supported, Partialclash premiumconfig supported. - Profiles management and enhancement (by yaml and Javascript). Doc
- Simple UI and supports custom theme color.
- Built-in support Clash.Meta core.
- System proxy setting and guard.
Install
Download from release. Supports Windows x64, Linux x86_64 and macOS 11+
Or you can build it yourself. Supports Windows, Linux and macOS 10.15+
Notes: If you could not start the app on Windows, please check that you have Webview2 installed.
FAQ
1. macOS "Clash Verge" is damaged and can't be opened
open the terminal and run sudo xattr -r -d com.apple.quarantine /Applications/Clash\ Verge.app
Development
You should install Rust and Nodejs, see here for more details. Then install Nodejs packages.
yarn install
Then download the clash binary... Or you can download it from clash premium release and rename it according to tauri config.
# force update to latest version
# yarn run check --force

yarn run check
Then run
yarn dev

# run it in another way if app instance exists
yarn dev:diff
Or you can build it
yarn build
Acknowledgement
Clash Verge was based on or inspired by these projects and so on:
- tauri-apps/tauri: Build smaller, faster, and more secure desktop applications with a web frontend.
- Dreamacro/clash: A rule-based tunnel in Go.
- MetaCubeX/Clash.Meta: A rule-based tunnel in Go.
- Fndroid/clash_for_windows_pkg: A Windows/macOS GUI based on Clash.
- vitejs/vite: Next generation frontend tooling. It's fast!
from
https://github.com/zzzgydi/clash-verge/tree/main
-------------------------------------------------------------
注意:clash内核无法使用这些节点,你要用clashmeta
开启浏览器自带doh以及客户端tun模式也可绕过封锁,参考:https://blog.mareep.net/posts/9993/
注意事项
套上warp可绕过chromego封锁的网站
如何修改为自己的warp节点
订阅链接分享
不套warp版本(clashmeta)
不含hysteria2节点
https://mareep.netlify.app/sub/merged_proxies.yaml
含hysteria2节点(节点最全)
https://mareep.netlify.app/sub/merged_proxies_new.yaml
套warp版本(clashmeta)
不含hysteria2节点
https://mareep.netlify.app/sub/merged_warp_proxies.yaml
含hysteria2节点(节点最全)
https://mareep.netlify.app/sub/merged_warp_proxies_new.yaml
通用链接 (shadowrocket和nekoray)
https://mareep.netlify.app/sub/shadowrocket_base64.txt
sing-box订阅链接
https://sing-box-subscribe.vercel.app/config/https:/mareep.netlify.app/sub/merged_proxies_new.yaml
客户端推荐
Windows
android
ios
- shadowrocket
macos
- clashx.meta
- clash verge
- shadowrocket
致谢
from
-----------------------------------------------------------
相关帖子:
clash的TUN模式 - login url: www.hatena.ne.jp/login, 文章分类:https://briteming.hatenablog.com/categories
ClashX Pro - login url: www.hatena.ne.jp/login, 文章分类:https://briteming.hatenablog.com/categories
---------------------------------------------------------------------------------------------
Clash 实现任何平台不用代理软件而翻墙
这个有点标题党的意思了啊嘿嘿嘿,还是需要电脑上有 Clash 或者其他可以实现本地代理的软件的
这种方法类似软路由代理一样,只要一台设备开着就可以让全家的设备科学上网(前提是要同 wifi),当然,电脑关机就会断开代理了。
这里就以 windows 端的 Clash 和 Android 手机来作为例子
电脑端设置
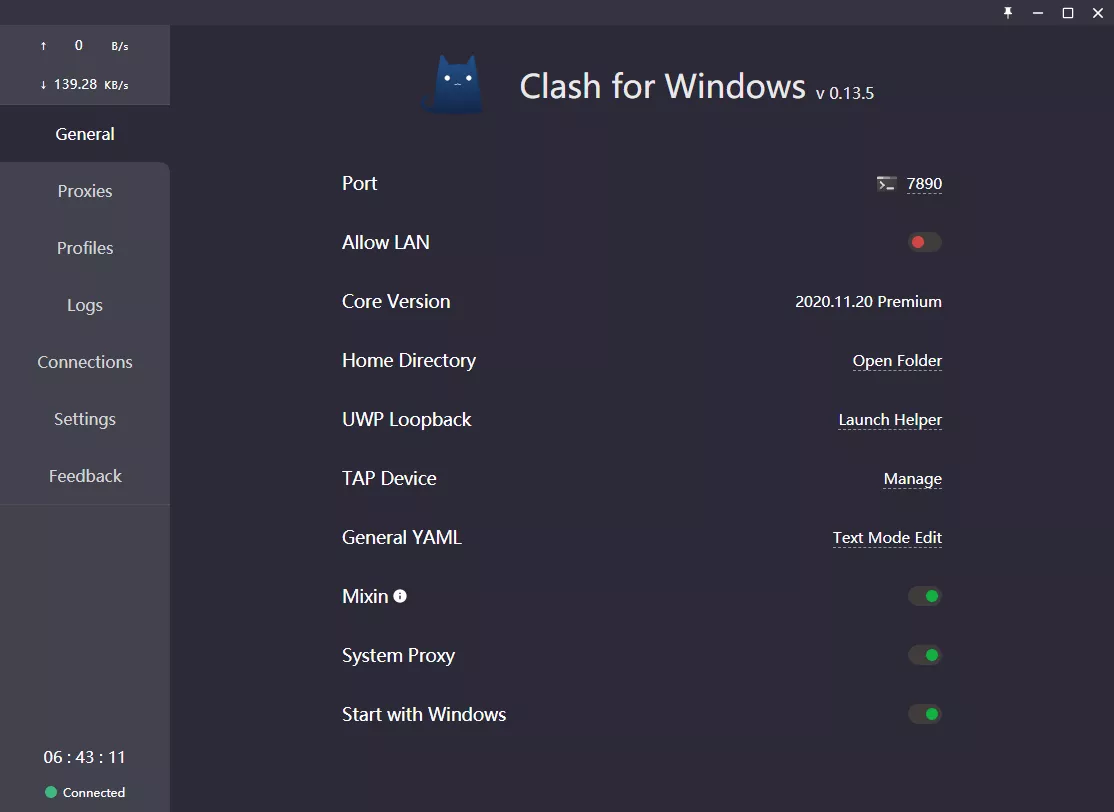
首先打开 Clash 的 Allow LAN 功能,然后下方应该会出现你的局域网 IP 连接地址,如果没有,那把鼠标移到 Allow LAN 这个选项就能显示。
记下这个 IP 地址, 192.168.2.105
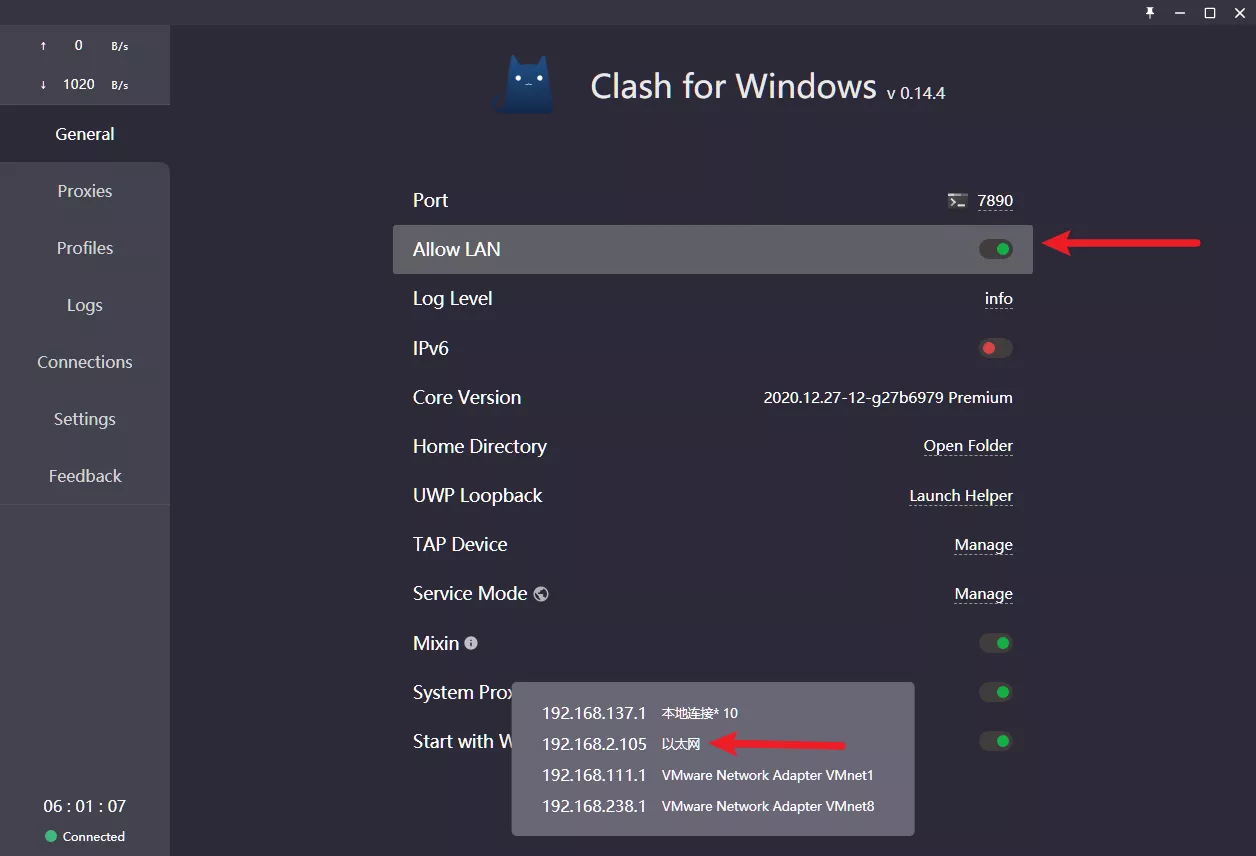
还需要记下端口号,如果未经过修改的话一般默认端口号是 7890
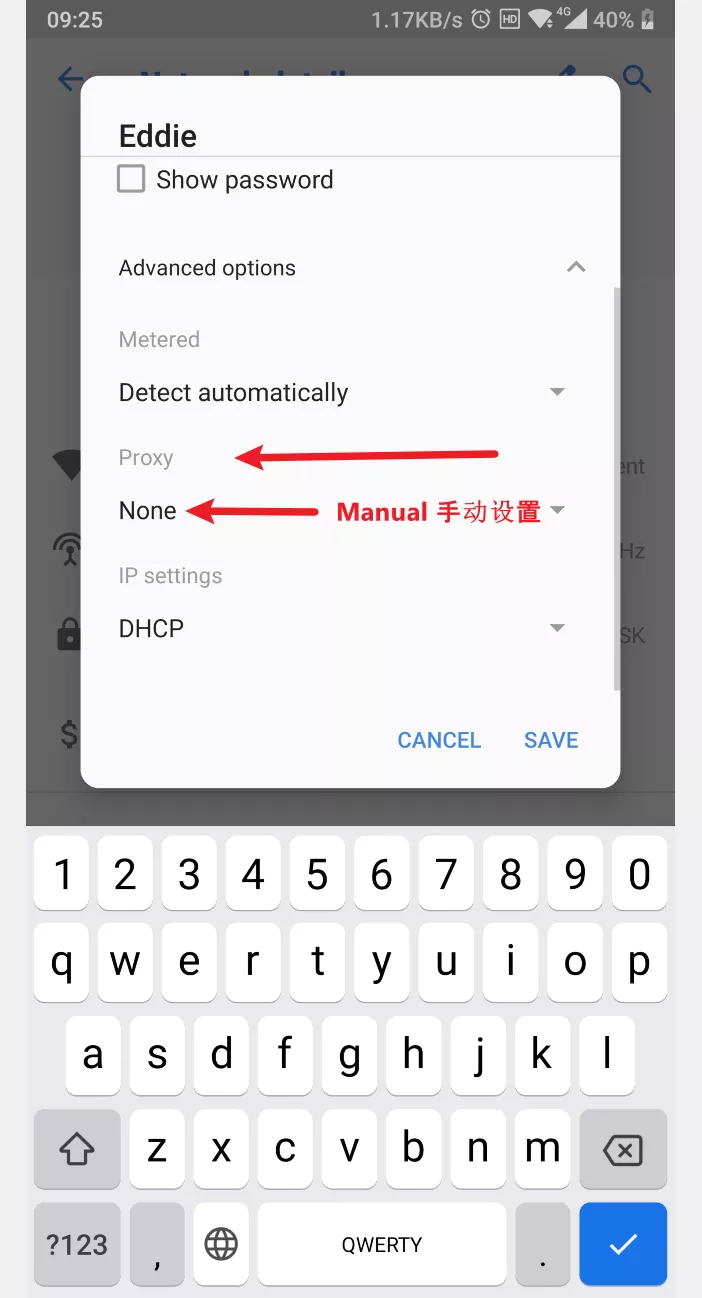
其他设备设置
这里以安卓手机为例,别的设备基本都大同小异,支持 Android,iOS,mac,Linux,Android TV 等设备
在和电脑连接的同 WiFi 环境下,打开连接的 WiFi 设置,应该会有如下设置,找到 proxy 代理设置,并设置为 Manual 手动。
这里的 host 就填刚刚记下的主机 IP,端口号就是 7890 ,保存
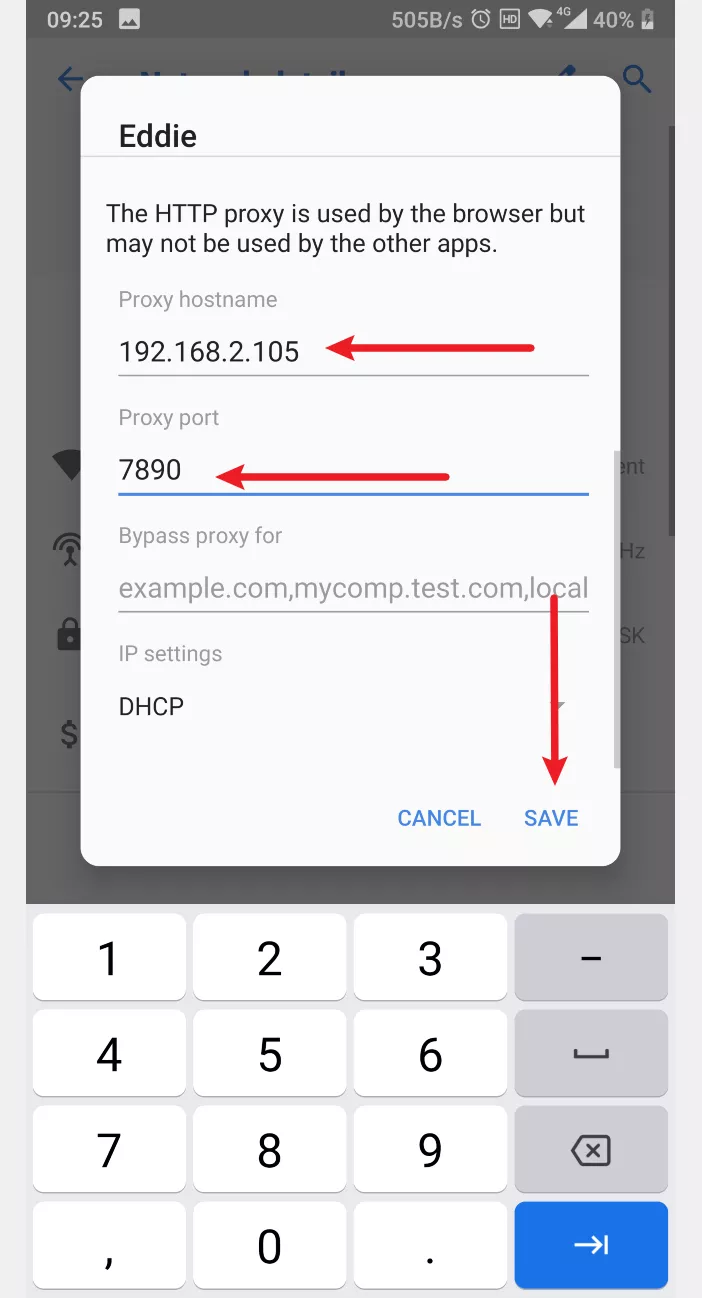
然后就可以连接科学上网了,注意上方任务栏没有 VPN 连接标志

理论
所以理论来说,只要你能找到一台旧电脑,能带的动 clash 并且 WiFi 功能还不错,就可以当一个一直开机的 “软路由代理” 用了。
------------------------------------------------
clash for windows客户端的备份
https://github.com/cfwbackup/clash_for_windows_pkg_backup
https://archive.org/details/clash_for_windows_pkg
https://archive.org/download/clash_for_windows_pkg
----------------------------------------------------
Clash for windows版教程
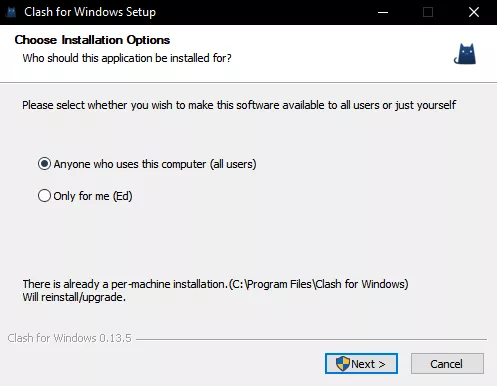
安装软件
-
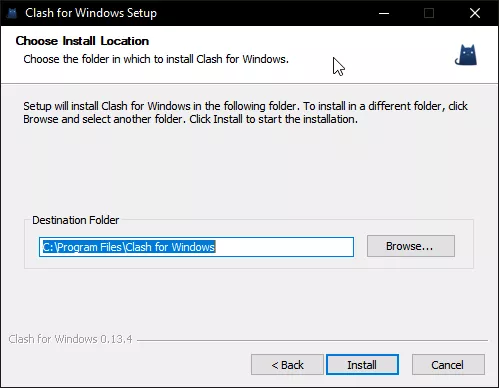
- 双击打开 Clash for windows.exe,同意权限,选择给所有用户安装(图一),点击 next
- 默认安装位置即可,(如果想要更改安装位置,点击 Browse… 选择)点击 Install(图二)
打开软件
耐心等待安装完成,双击打开桌面的快捷方式 Clash for Windows(图三)
导入节点组
订阅链接和 yml 文件二选一即可,不是都需要。大部分情况都是订阅链接。
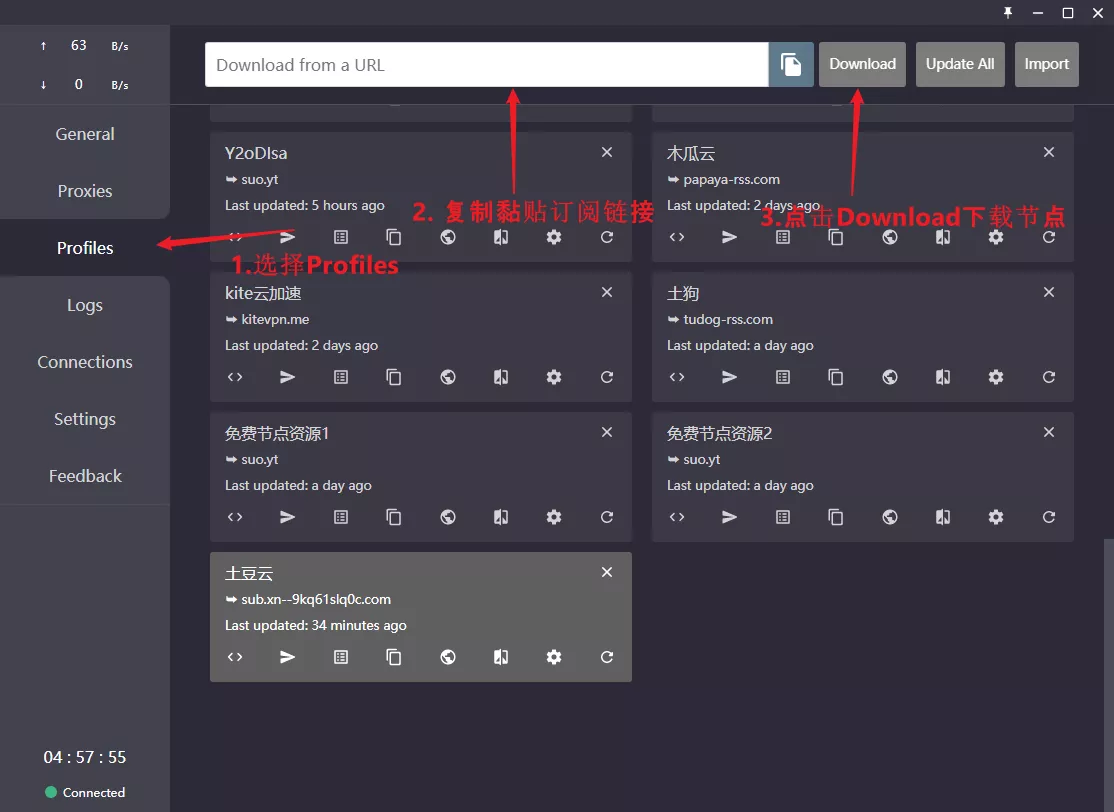
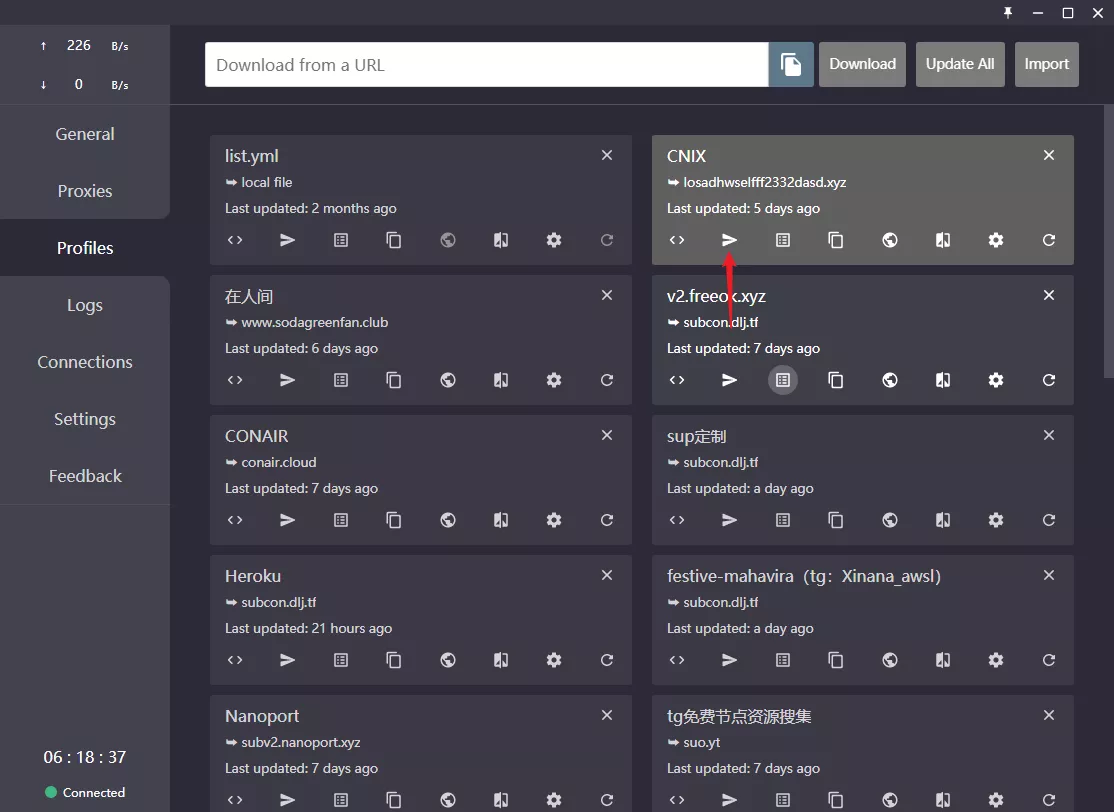
(1)订阅链接导入方法
首先点击 Profiles,将订阅链接复制到图中白框内,点击 Download 下载节点组(图四)
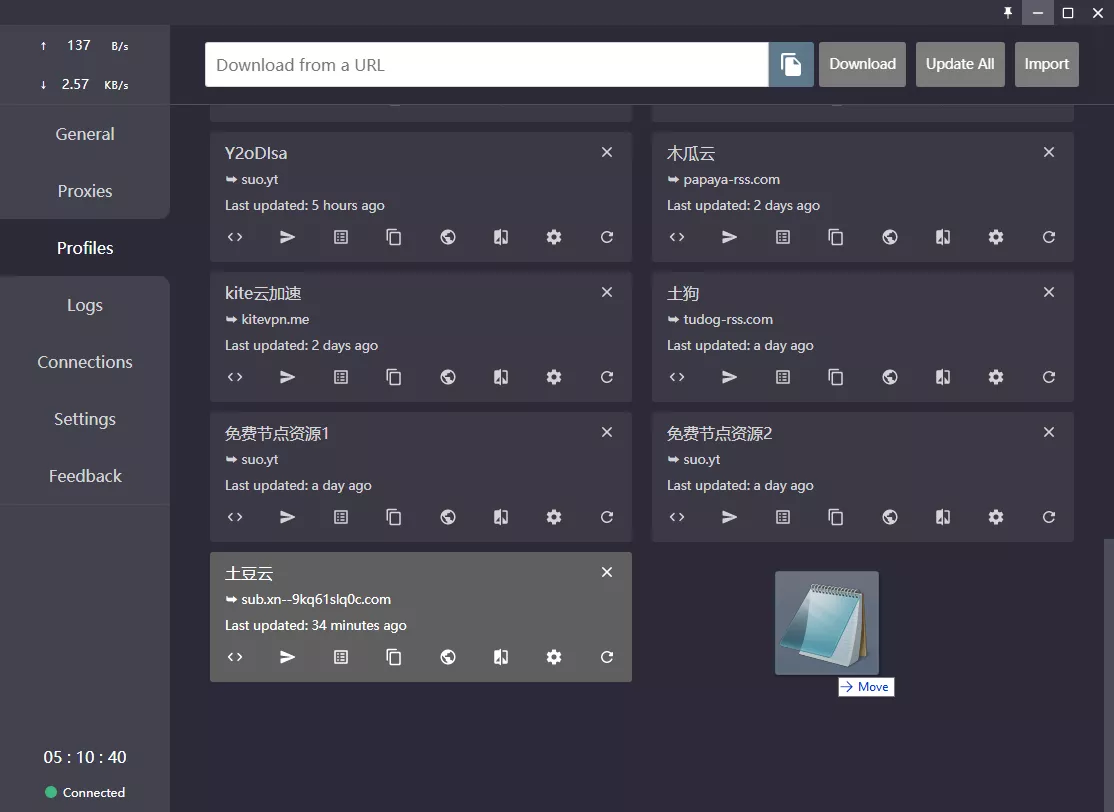
(2)yml 文件导入教程
将如(图五)所示的 yml 文件 (或 txt 文件) 拖入到 Profiles 中(图六)

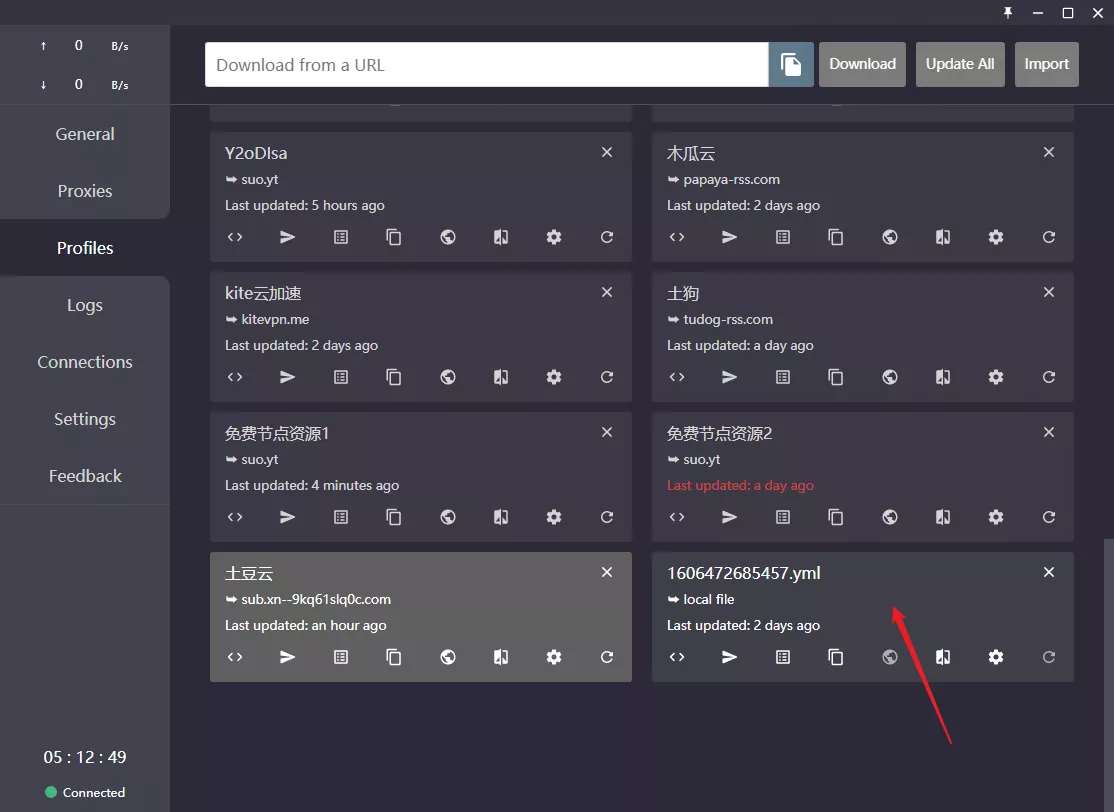
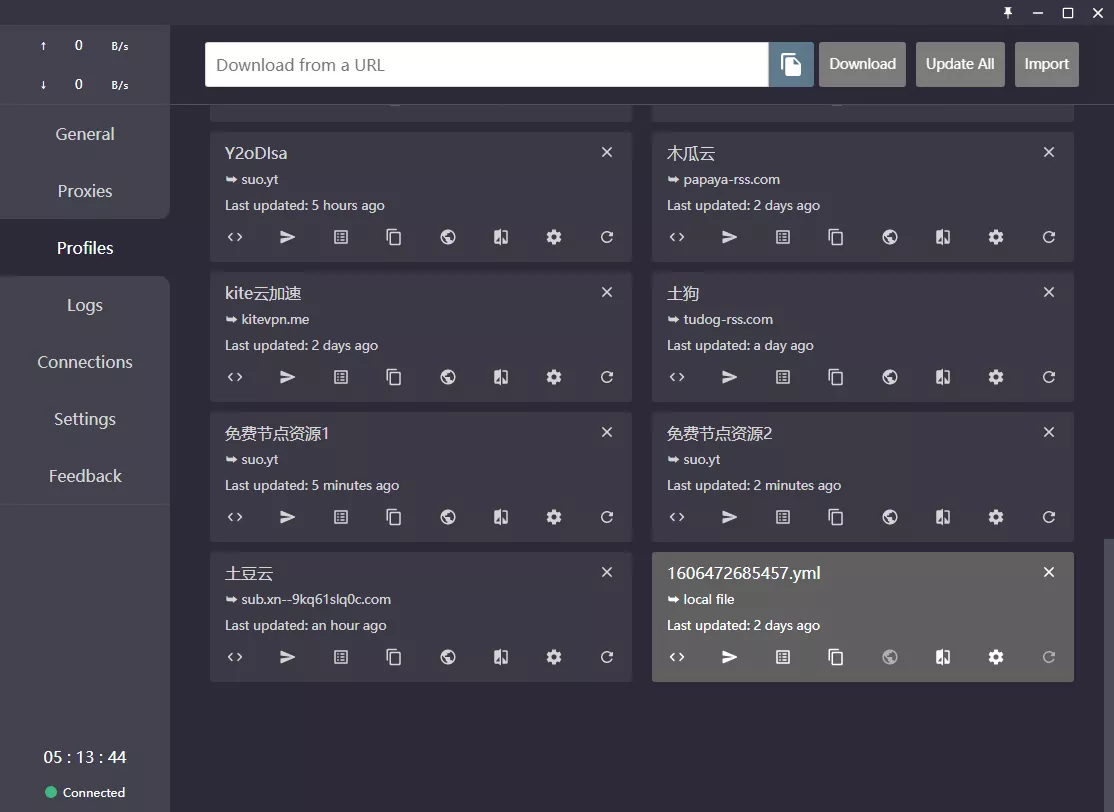
选择节点组
在 Profiles 中选择你想要链接的节点组(图七),左键单击即可选择,如果选中,节点组会变成灰色(图八),即为选中。
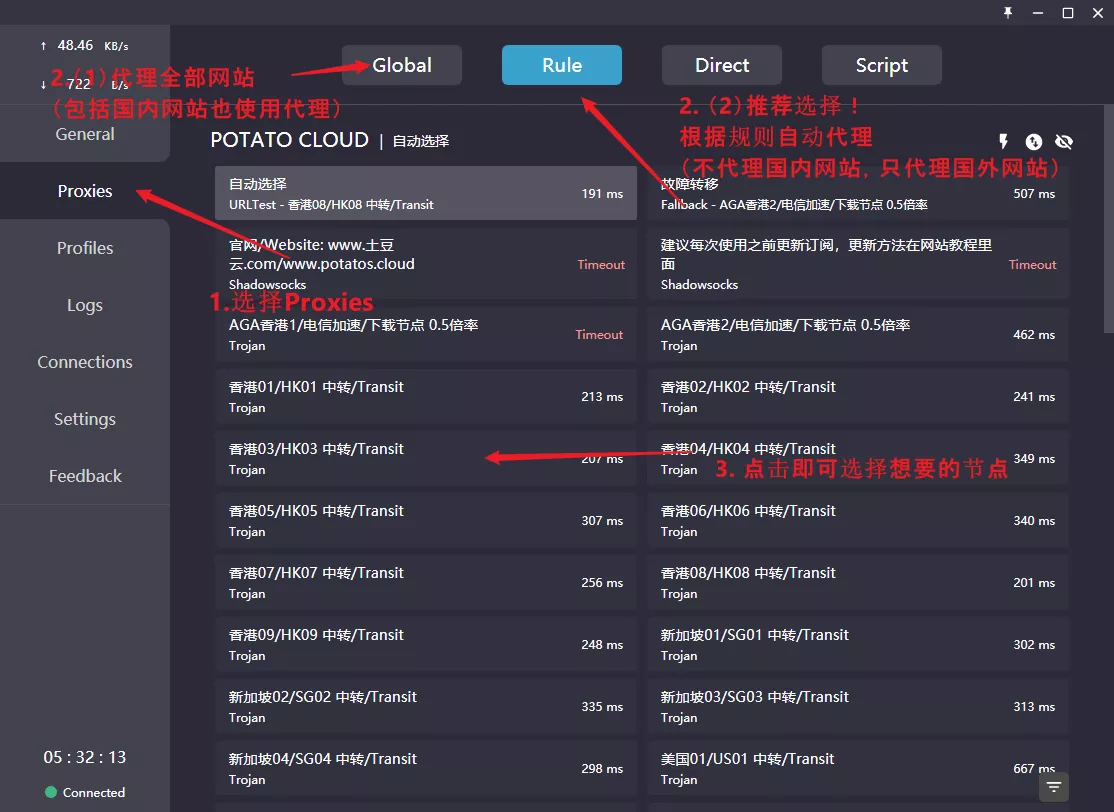
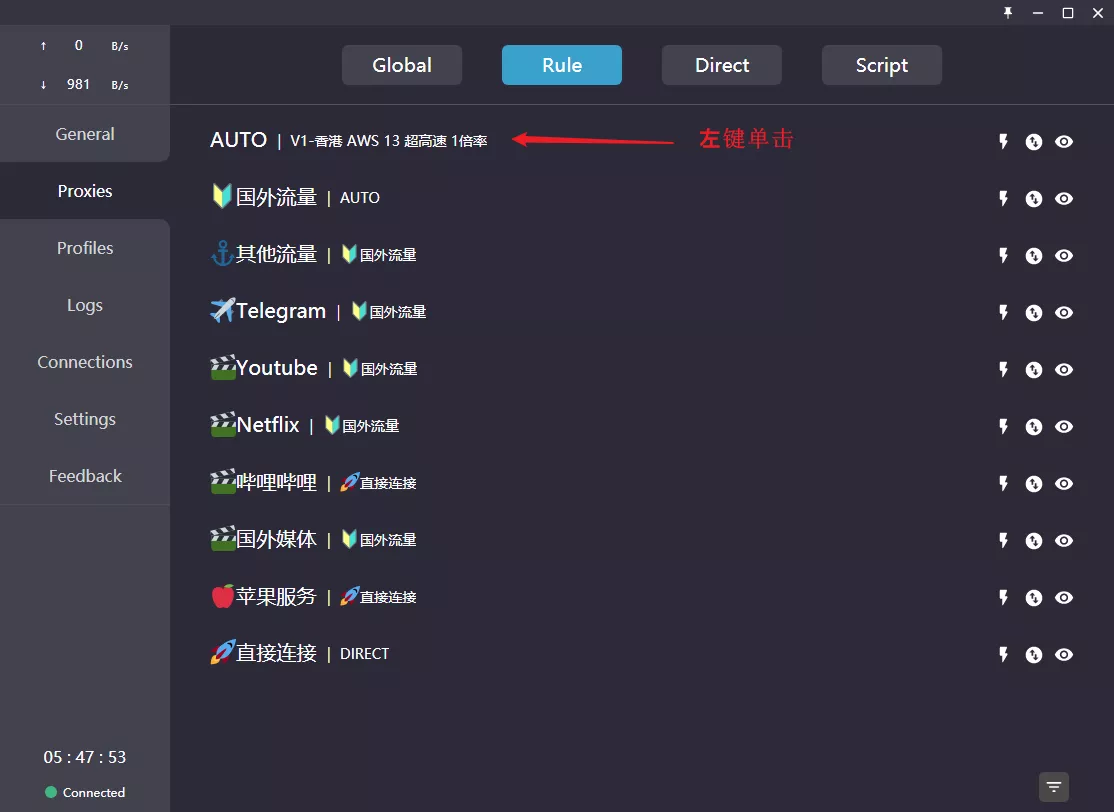
选择节点
- 在 Proxies 中选择你想连接的节点(图九(1))。推荐选择 Rule(自动不代理国内网站,仅代理国外),如果需要全局代理全部网站时,再选择 Global,并选择你想选择的节点即可。
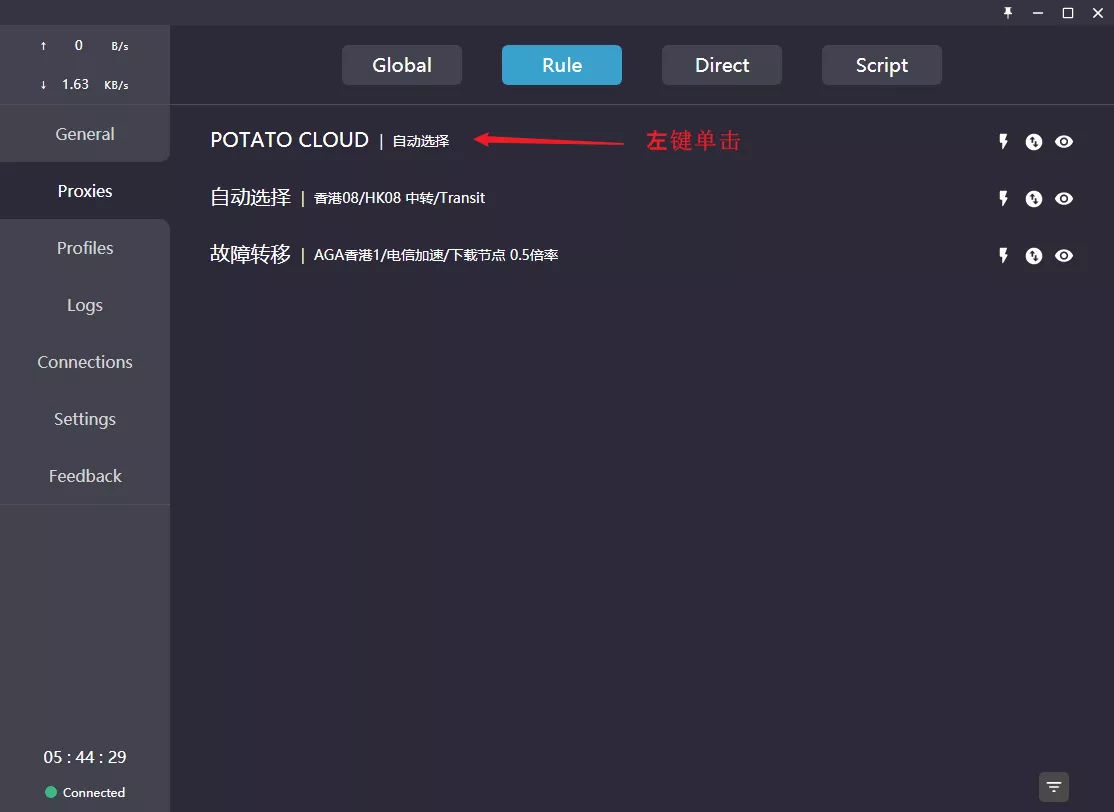
- 如果 Proxies 中没有自动显示(图九(1))的内容,左键单击第一个列表即可展开(图九(2)、图九(3))。
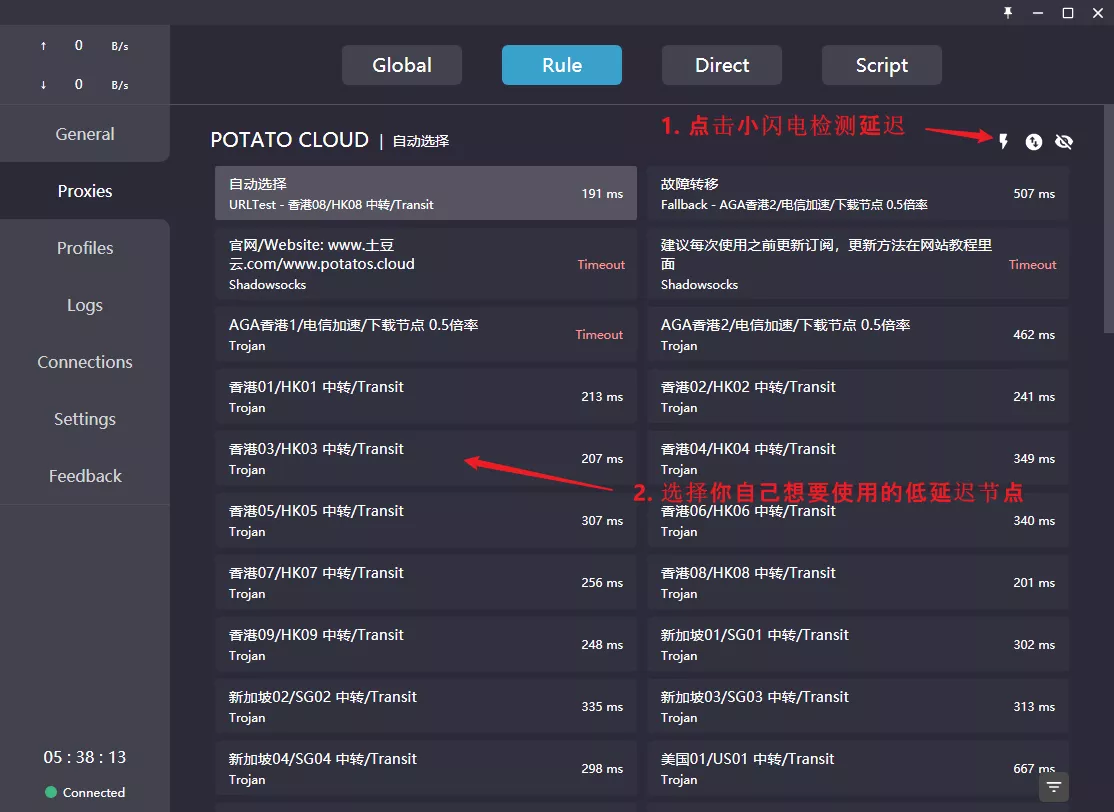
- 可以点击小山地推荐根据延迟检验结果,选择延迟低(ms 值小)的节点(图十)。
- 注意:如果有自动选择的话,选择自动选择即可,软件会自动选择延迟最低的节点。
- 注意:软件有负载均衡会无法选择节点,忽略此步即可。
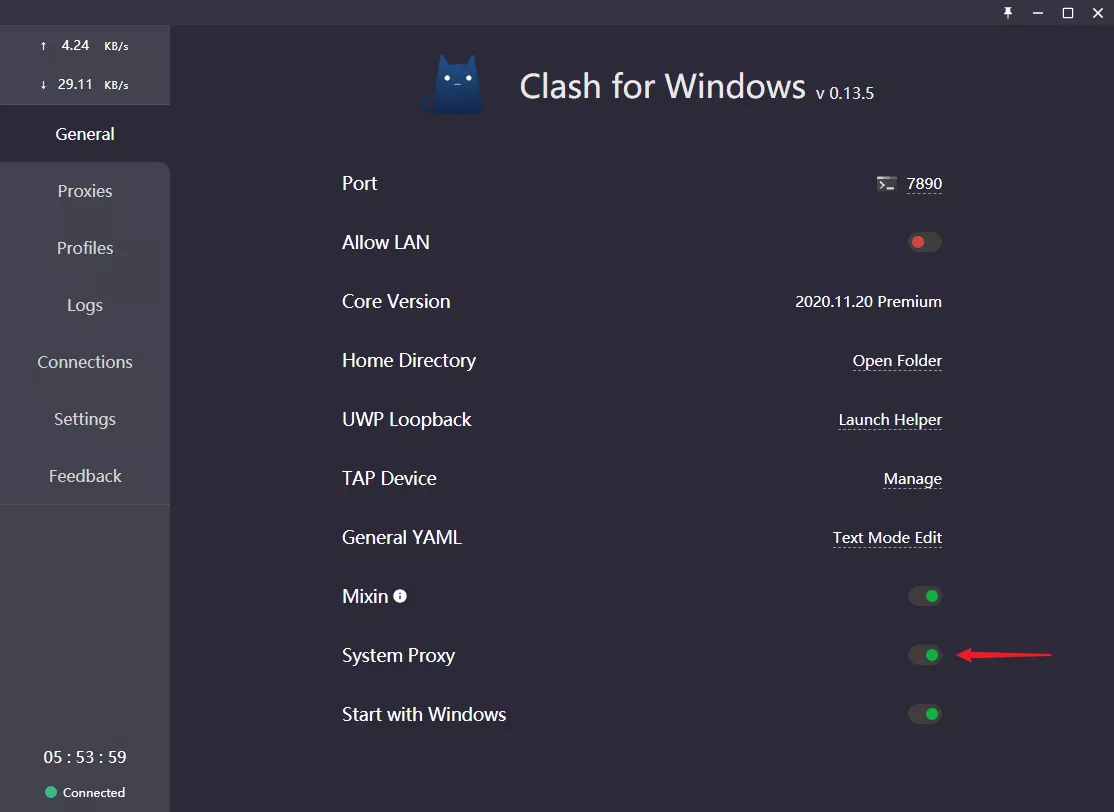
连接节点
在 General 中打开 System Proxy 就可以了。如果有弹窗请求连接网络,同意即可。如果想要让此软件随系统开机自启动,打开 Start with Windows 即可。(图十一)
至此就是 Clash Windows 端的使用教程了,以下为 Clash 的一些进阶玩法,有兴趣可以试试
自定义节点组规则
- 打开节点组策略
- 左侧即为 Proxy Groups 以及 Proxies,右侧为每个 Proxy Groups 中的每个节点信息
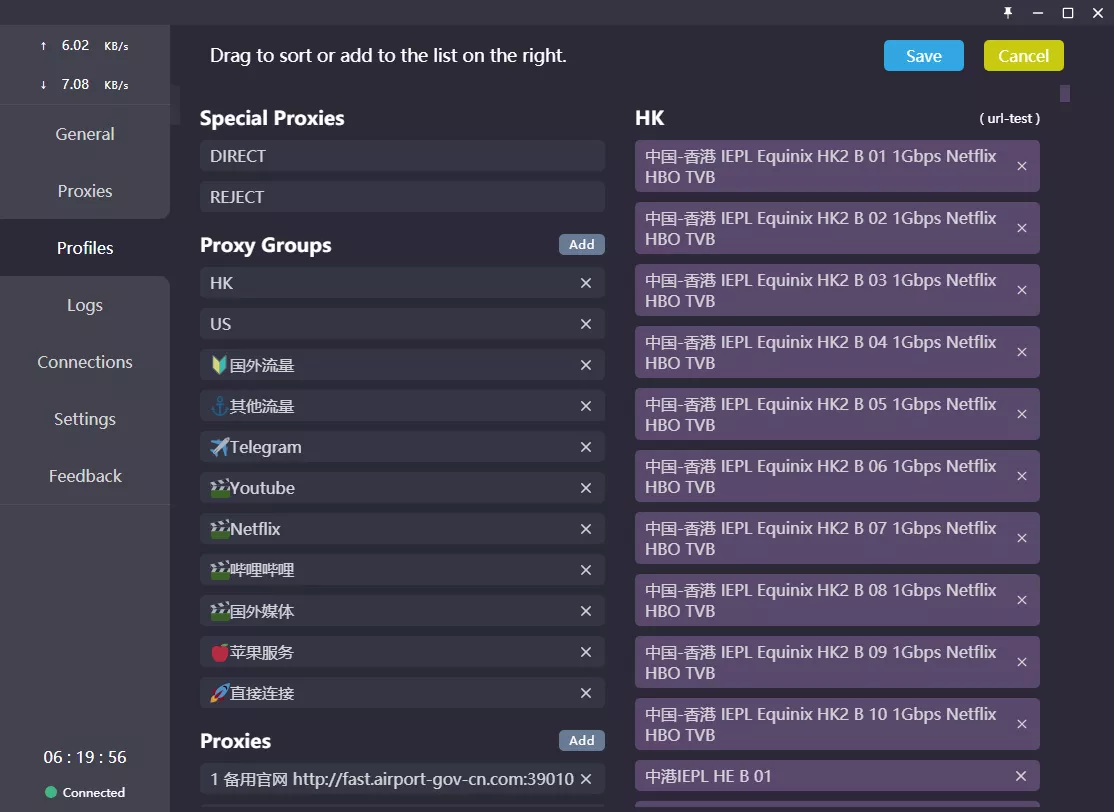
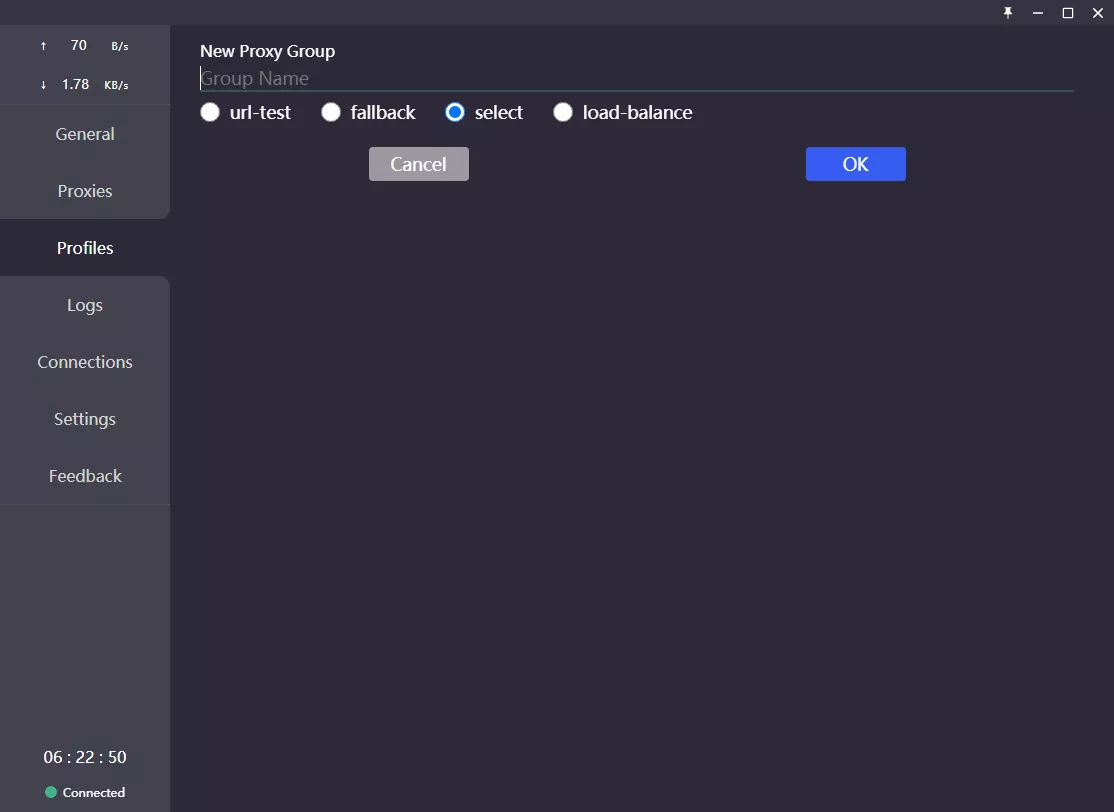
- 可以点击 Proxy Groups 边上的 Add 添加一个 Proxy Group(左到右依次是自动选择,故障转移,手动选择和负载均衡)根据自己需要创建 Group Name 以及选择功能。
- 现在就可以拖动自定义 Proxy Groups 的顺序以及节点到新建的 Proxy Group 中
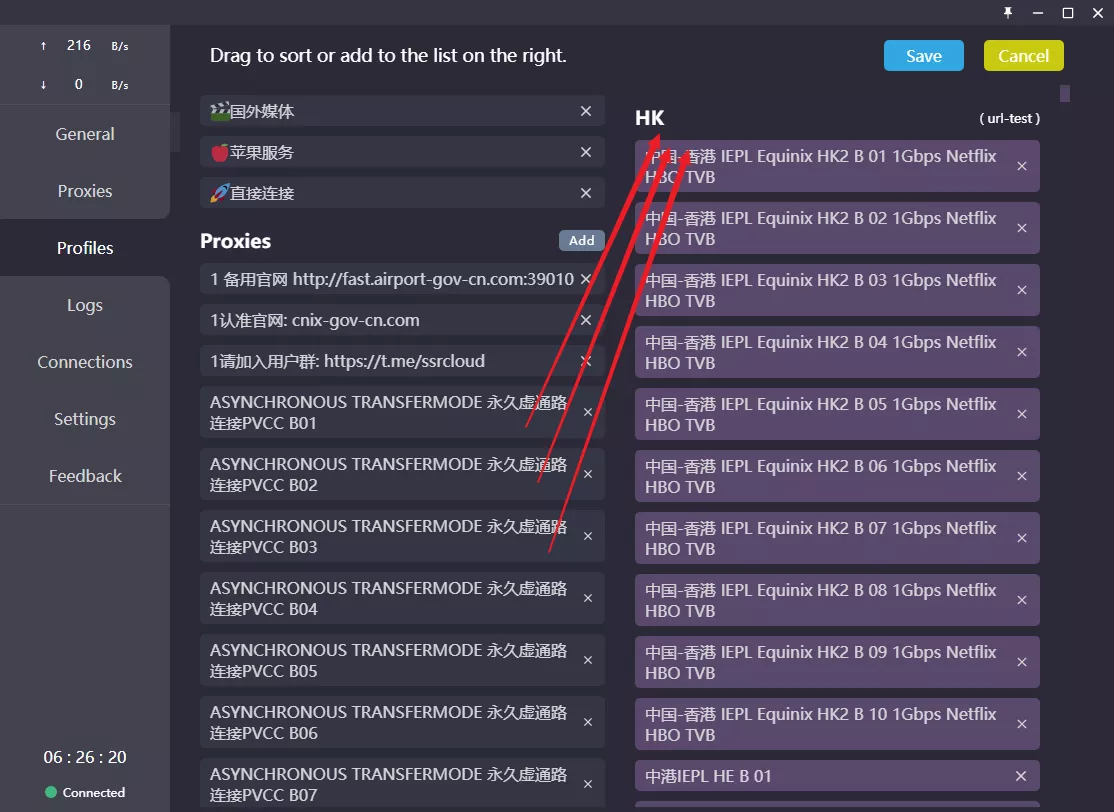
-
切记要点击右上角的 Save 保存你的设置
-
在 Proxies 中选择你新创建的 Proxy Group 即可
选择代理网站 / 域名
- 打开规则
- 可以添加或者删除域名网站等
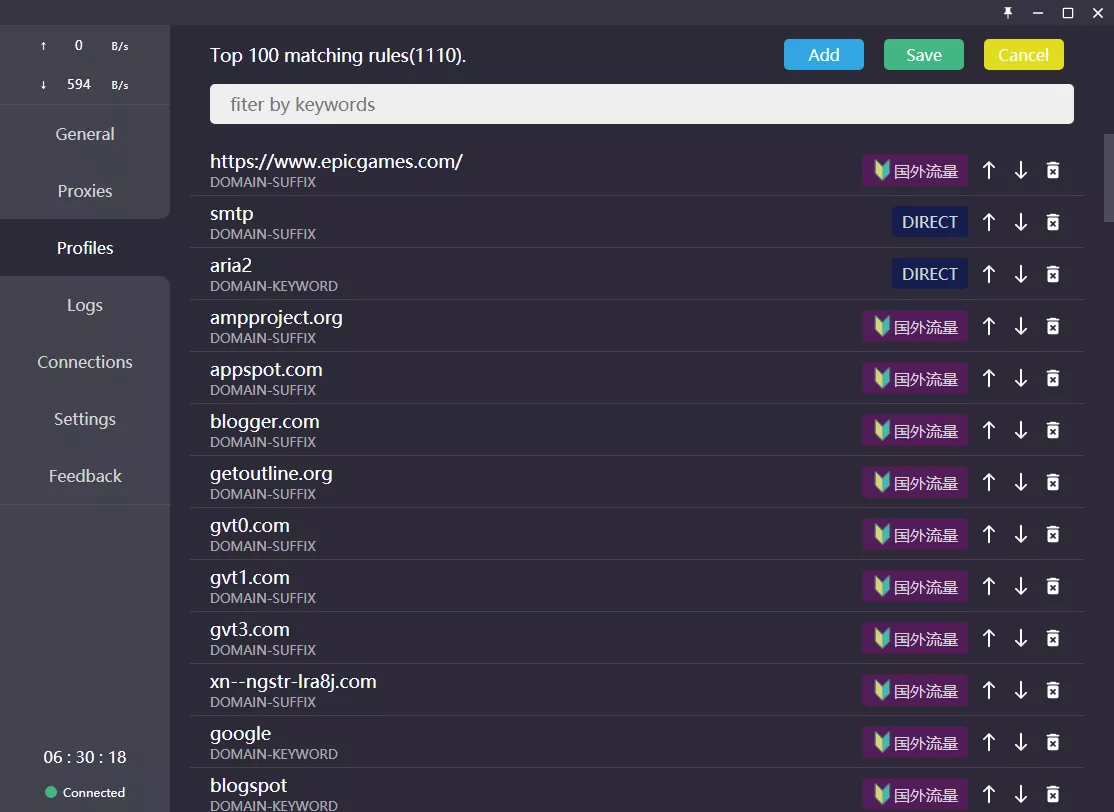
- 创建一个新的规则
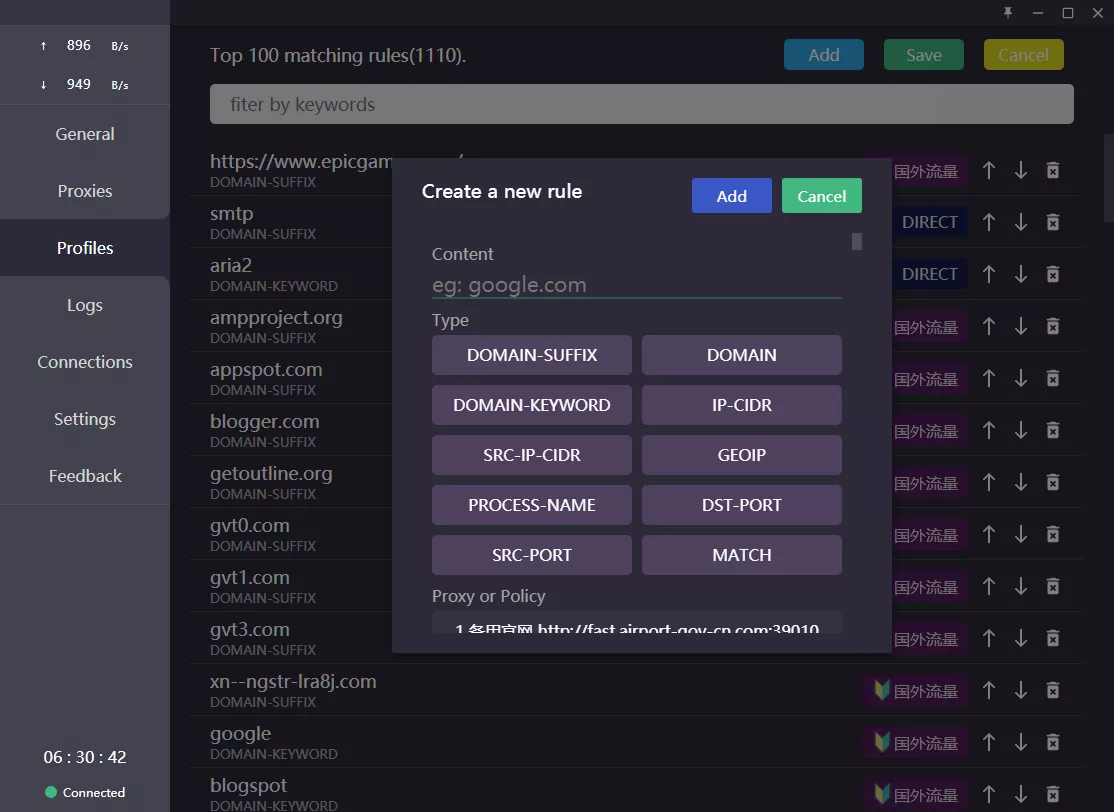
- 记得保存!
Q&A 有问题请看这里
安装完成后无法正常代理
重启一次试试,很多电脑在刚安装完 clash 以后无法立即使用,代理端口没法正常启用,重启后再次尝试。
为什么重启了还是连不上(系统代理打开以后会自动关闭)
具体表现为系统代理打开以后会自动关闭。
首先去系统设置里面清除系统代理设置
如无法解决,则检查是否有其他安全 / 代理软件修改代理设置
如果装有 QQ 输入法或者 QQ 音乐等腾讯系软件,建议卸载或者禁止开机自动启动,此类毒瘤软件会更改系统代理设置。特别是 QQ 输入法
(参考自 Sabrina 的万事屋 https://merlinblog.xyz/wiki/cfw.html )
要是还是连不上怎么办
Clash 作者给出的解决方法 https://github.com/Fndroid/clash_for_windows_pkg/issues/312
下载 Process Monitor,观察(仅包含) HKCU\Software\Microsoft\Windows\CurrentVersion\Internet Settings\ 这个键值被什么应用修改,关闭应用进行测试
大部分是 UWP 类应用自动修改系统代理,而导致和 Clash 的代理冲突,从而没法正确上网。
可以看到下方反馈中,很多反馈 QQ 拼音输入法和 QQ 音乐的。可能还有其他也会修改系统代理的软件,就需要用 Porcess Monitor 自己去发现,然后关闭 / 卸载了。
为什么打开电脑没有网络,再打开 Clash 就有网络了
具体表现为开机后打开任何网页都没法加载,但是再打开 Clash 这个软件就都恢复正常了。
这是因为 Clash 在关机前没有正确关闭。因为该软件是会修改系统代理的,所以需要在关机前先关闭该软件的系统代理,然后再关机。
否则,电脑会在开机后一直连接着关机前的系统代理,而 Clash 却没有启动,自然就会发生连接不上,没有网络的错误。
解决方法就是:
关机前先关闭 Clash 的系统代理再关机,或者开机后再手动启动 Clash
推荐把 Clash 设置为系统自动启动,他会自动分流,不代理国内流量,所以不用担心国内访问会变慢。
--------------------
clash for windows汉化版. 提供clash for windows的汉化版, 汉化补丁及汉化版安装程序 .
Clash for Windows Chinese
Clash 汉化版
提供clash for windows的汉化版, 汉化补丁以及汉化版Clash安装程序
效果图

效果图的版本可能不是当前最新兼容的
支持的clash版本:
基本特征&介绍:
- 使用安装程序(Clash.for.Windows.Setup. ** . ** . ** .exe)安装的汉化版CFW将劫持更新,之后可直接通过应用内置的更新方式进行汉化版/软件更新
- 使用安装包(Clash.for.Windows- ** . ** . ** -win.7z)请不要在解压时选择解压到当前文件夹,否则软件相关的所有文件将放到当前所在文件夹
- app.asar需要替换掉对应版本的原版app.asar以完成汉化
- 使用7z格式压缩包(app.7z)需要先进行解压,然后提取里面的app.asar并替换掉原有文件以完成汉化,即在节省流量
下载前你需要知晓的内容:
赞助商的广告
购买小火箭、圈X、Google voice👉神马杂货铺
快速使用 ChatGPT:chat1.woaiai.cc
快速导航
能够解压7z格式的软件
NanaZip (兼容Windows11)
from
------------------------------------------------------
clash_for_windows一键更新工具 .
cfw-updater


clash_for_windows的一键更新工具(仅限Windows和macOS), 支持汉化补丁一起安装, 支持cfw版本的任意切换和便携模式。updater本身支持自更新(每次启动检测到新版会自动更新)
当前可选的汉化列表(可任意切换):
- https://github.com/BoyceLig/Clash_Chinese_Patch
- https://github.com/ender-zhao/Clash-for-Windows_Chinese
命令行
Usage of cfw-updater:
  -v    显示版本号
  -f    强制更新cfw(默认和已存在版本相同则不更新)
注意
更新工具会用到cfw的代理来下载最新包,所以下载安装包的速度取决于cfw节点的速度。此工具只能用于更新cfw而不能全新安装.
from
https://github.com/Jrohy/cfw-updater
----------------------------------------------
Clashr
A rule-based tunnel in Go.


Features
- Local HTTP/HTTPS/SOCKS server with/without authentication
- VMess, Shadowsocks, ShadowsocksR, Trojan (experimental), Snell protocol support for remote connections. UDP is supported.
- Built-in DNS server that aims to minimize DNS pollution attacks, supports DoH/DoT upstream. Fake IP is also supported.
- Rules based off domains, GEOIP, IP CIDR or ports to forward packets to different nodes
- Remote groups allow users to implement powerful rules. Supports automatic fallback, load balancing or auto select node based off latency
- Remote providers, allowing users to get node lists remotely instead of hardcoding in config
- Netfilter TCP redirecting. You can deploy Clash on your Internet gateway with
iptables. - Comprehensive HTTP API controller
Install
Clashr requires Go >= 1.13. You can build it from source:
$ go get -u -v github.com/paradiseduo/clashr
Pre-built binaries are available here: release
Pre-built Premium binaries are available here: Premium release. Source is not currently available.
Check Clashr version with:
$ clashr -v
Daemonize Clashr
Unfortunately, there is no native or elegant way to implement daemons on Golang. We recommend using third-party daemon management tools like PM2, Supervisor or the like to keep Clashr running as a service.
In the case of pm2, start the daemon this way:
$ pm2 start clashr
If you have Docker installed, it's recommended to deploy Clashr directly using docker-compose: run Clashr in Docker
Config
The default configuration directory is $HOME/.config/clash.
The name of the configuration file is config.yaml.
If you want to use another directory, use -d to control the configuration directory.
For example, you can use the current directory as the configuration directory:
$ clashr -d .
This is an example configuration file (click to expand)
Advanced
Documentations
from
https://github.com/paradiseduo/clashr
-------------------------------------------------
A rule based custom proxy with GUI for Mac based on clash.
ClashXR
Since the native clash core already supports the SSR protocol, this project will stop maintenance from now on, thank you for your support all the way ❤️
A rule based proxy For Mac base on Clashr(support chacha20).
Based on clashX
You can do this to use ClashXR.
Features
- HTTP/HTTPS and SOCKS protocol
- Surge like configuration
- GeoIP rule support
- Support Vmess/Shadowsocks/ShadowsocksR/Socks5/Torjan
- Support for Netfilter TCP redirect
Install
You can download from release page, or use homebrew
brew cask install clashxr
Build
-
Make sure have python3 and golang installed in your computer.
-
Download deps
bash install_dependency.sh -
Build
-
Signature check
./SMJobBlessUtil.py setreq /path/to/ClashXR.app ClashXR/Info.plist ProxyConfigHelper/Helper-Info.plist
-
Build and run.
Config
The default configuration directory is $HOME/.config/clash
The default name of the configuration file is config.yaml. You can use your custom config name and switch config in menu Config section.
To Change the ports of ClashX, you need to modify the config.yaml file. The General section settings in your custom config file would be ignored.
Checkout Clash or SS-Rule-Snippet for Clash for more detail.
Advance Config
Change your status menu icon
Place your icon file in the ~/.config/clash/menuImage.png then restart ClashX
Change default system ignore list.
-
Download sample plist in the Here and place in the
~/.config/clash/proxyIgnoreList.plist
-
Edit the
proxyIgnoreList.plistto set up your own proxy ignore list
Use url scheme to import remote config.
-
Using url scheme describe below
clash://install-config?url=http%3A%2F%2Fexample.com&name=examplefromhttps://github.com/paradiseduo/ClashXR
----------------------------------------------------
routers:
https://github.com/vernesong/OpenClash
https://github.com/juewuy/ShellClash
https://github.com/frainzy1477/luci-app-clash