在heroku.com空间上,搭建反向代理
Spin up a reverse proxy quickly on Heroku。
Run a reverse proxy using nginx on Heroku.

Installation
Use the Deploy to Heroku button above to create a copy of the app.
from https://github.com/octoberswimmer/heroku-reverse-proxy
-------------------------
A sample 3Scale API Proxy running on Heroku。
3Scale API Proxy using Heroku
This is a sample app showing how to run a 3Scale API Proxy on Nginx using the OpenResty buildpack.
Learn about 3scale's API proxy on Nginx
Usage
Step 1: Get 3Scale and Heroku Accounts
Get a free 3Scale account. (When prompted, I suggest letting 3Scale generate a sample application and account for you.) Get a free Heroku.com account. Download the Heroku toolbelt
Step 2: Configure 3Scale Api Proxy and download Nginx config files
Follow 3Scale's instructions on setting up an Nginx proxy. Once you've configured your sandbox proxy, download the Nginx config files. (Skip 3scale's instructions for deploying on AWS since we'll be deploying on Heroku)
Step 3: Clone this repo
#Clone this repo, or your own fork of it (use your repo's URL obviously)
$ git clone https://github.com/Taytay/api-proxy-3scale-heroku.git

#go into newly cloned folder
$ cd api-proxy-3scale-heroku
Step 4: Rename the generated .conf files
When you unzip the config files that 3Scale gave you, they will look something like:
$ ls ~/proxy_configs
nginx_1234567890123.conf nginx_1234567890123.lua
Copy them into your newly cloned folder and rename them to nginx.conf and nginx_3scale_access.lua
#Copy and rename the generated .conf and .lua files
$ cp ~/proxy_configs/nginx_1234567890123.conf ./nginx.conf
$ cp ~/proxy_configs/nginx_1234567890123.lua ./nginx_3scale_access.lua
Step 5: Modify nginx.conf
Make the following mandatory modifications to the nginx.conf file:
#1. Add this line to the top of the file
daemon off;
#2. replace 'listen 80;' with:
listen ${{PORT}};
#3. replace 'access_by_lua_file lua_tmp.lua;' with:
access_by_lua_file nginx_3scale_access.lua;
See the sample nginx.sample.conf file for details, and for notes on other optional changes you can make.
Step 5: Create Heroku app
Create your heroku app, using the heroku-buildpack-lua buildpack:
$ heroku apps:create --buildpack http://github.com/leafo/heroku-buildpack-lua.git <heroku-app-name>
Commit your changes to git
$ git add .
$ git commit -m "Configuring the proxy with generated files from 3Scale"
Deploy the app to heroku
$ git push heroku master
...
-----> Fetching custom git buildpack... done
-----> Lua app detected
...
-----> Discovering process types
       Procfile declares types -> web

-----> Compiled slug size: 5.0MB
-----> Launching... done, v14
       http://<heroku-app-name>.herokuapp.com deployed to Heroku
Test your API proxy using an app_id and app_key you get from your 3scale control panel. More info about these credentials here
$ curl http://<heroku-app-name>.herokuapp.com/v1/word/awesome.json\?app_id\=YOUR_USER_APP_ID\&app_key\=YOUR_USER_APP_KEY

{"word":"awesome","sentiment":4}%
Troubleshooting
If something goes wrong when nginx starts up, just run heroku logs You should see something like:
2013-05-04T09:30:04.199607+00:00 heroku[web.1]: Starting process with command `start_nginx.sh`
2013-05-04T09:30:10.112438+00:00 heroku[web.1]: State changed from starting to up
Motivations
I wanted a free way to host 3Scale's Nginx API proxy. They have a hosted proxy, but it's only for sandbox/testing use. Nginx is very efficient, so you won't need to deploy another Heroku dyno unless you're pushing insane API traffic. That keeps this within the free usage tier on Heroku.
3Scale's AWS instructions are great, but it's even more appealing to me to run Nginx on Heroku because
- It's free
- More stuff is managed for me
- It's on AWS under the hood anyway
- My Nginx config files are guaranteed to be revisioned in Git
Credits
3Scale did the cool part by making their API proxy simply an open Nginx config. Nice!
The OpenResty buildpack did the hard Heroku work! Thanks!
from https://github.com/Taytay/api-proxy-3scale-heroku
---------
Running 3Scale’s Nginx API proxy on Heroku
3Scale has published an official “Flash Tutorial” to my approach for running their proxy on Heroku.
I have been playing around with 3Scale’s API Proxy for a side project. 3Scale provides a wrapper around your API, and supports monetizing, authenticating, throttling, and plenty of other “API stuff” you might need.
Their proxy is simply a set of Nginx config files, but I didn’t want to start a new Micro AWS instance just to run it. So, I decided to try running Nginx on Heroku. I found some other folks who had already done the hard work, and cobbled together a working example. Now I’ve got an API Proxy running in Heroku’s free usage tier. Cool!
自建v2ray服务器教程
2018年4月19日对教程细节方面进行补充和更新。
不怕被封ip,因为vultr是折算成小时计费,且可以随时删除和开通服务器,新服务器就是新的ip。新开服务器只需要0.01美元,即使你运气非常不好,开了10台服务器才获得没有被墙的ip,总创建服务器成本也只有0.1美元,不到1块钱。开通服务器时,当出现了ip,不要立马去ping或者用xshell去连接,再等5分钟之后,有个缓冲时间。
自建v2ray教程很简单,整个教程分三步:
第一步:购买VPS服务器
第二步:一键部署VPS服务器
第三步:一键加速VPS服务器 (谷歌BBR加速,推荐)
【前言】
v2ray的优势:v2ray支持的传输方式有很多,包括:普通TCP、HTTP伪装、WebSocket流量、普通mKCP、mKCP伪装FaceTime通话、mKCP伪装BT下载流量、mKCP伪装微信视频流量,不同的传输方式其效果会不同,有可能会遇到意想不到的效果哦!当然国内不同的地区、不同的网络环境,效果也会不同,所以具体可以自己进行测试。
v2ray的劣势:目前v2ray支持的客户端种类不多,官网是上只有windows、MAC和linux版,ios和安卓版客户端至少官网上没有。关于客户端种类,ss/ssr是比较成熟的,这是ss/ssr的优势,但ss/ssr也有劣势,就是因为使用人数有点多,有可能以后会被专门针对进行干扰,所以多学一种翻墙技能有好处。
第一步:购买VPS服务器
VPS服务器需要选择国外的,首选国际知名的vultr,速度不错、稳定且性价比高,按小时计费,能够随时开通和删除服务器,新服务器即是新ip。
vultr注册地址: http://www.vultr.com/?ref=7048874 (全球15个服务器位置可选,KVM框架,最低2.5美元/月。如果以后这个vultr注册地址被墙了,那么就用翻墙软件打开,或者用ss/ssr免费账号)

虽然是英文界面,但是现在的浏览器都有网页翻译功能,鼠标点击右键,选择网页翻译即可翻译成中文。
注册并邮件激活账号,充值后即可购买服务器。充值方式是paypal(首选)或支付宝,使用paypal有银行卡(包括信用卡)即可。paypal注册地址:https://www.paypal.com (paypal是国际知名的第三方支付服务商,注册一下账号,绑定银行卡即可购买国外商品)
2.5美元/月的服务器配置信息:单核 512M内存 20G SSD硬盘 带宽峰值100M 500G流量/月
5美元/月的服务器配置信息: 单核 1G内存 25G SSD硬盘 带宽峰值100M 1000G流量/月
10美元/月的服务器配置信息: 单核 2G内存 40G SSD硬盘 带宽峰值100M 2000G流量/月
20美元/月的服务器配置信息: 2cpu 4G内存 60G SSD硬盘 带宽峰值100M 3000G流量/月
40美元/月的服务器配置信息: 4cpu 8G内存 100G SSD硬盘 带宽峰值100M 4000G流量/月
vultr实际上是折算成小时来计费的,比如服务器是5美元1个月,那么每小时收费为5/30/24=0.0069美元 会自动从账号中扣费,只要保证账号有钱即可。如果你部署的服务器实测后速度不理想,你可以把它删掉(destroy),重新换个地区的服务器来部署,方便且实用。因为新的服务器就是新的ip,所以当ip被墙时这个方法很有用。当ip被墙时,为了保证新开的服务器ip和原先的ip不一样,先开新服务器,开好后再删除旧服务器即可。
计费从你开通服务器开始算的,不管你有没有使用,即使服务器处于关机状态仍然会计费,如果你没有开通服务器就不算。比如你今天早上开通了服务器,但你有事情,晚上才部署,那么这段时间是会计费的。同理,如果你早上删掉服务器,第二天才开通新的服务器,那么这段时间是不会计费的。在账号的Billing选项里可以看到账户余额。
温馨提醒:同样的服务器位置,不同的宽带类型和地区所搭建的账号的翻墙速度会不同,这与中国电信、中国联通、中国移动国际出口带宽和线路不同有关,所以以实测为准。可以先选定一个服务器位置来按照教程进行搭建,熟悉搭建方法,当账号搭建完成并进行了bbr加速后,测试下速度自己是否满意,如果满意那就用这个服务器位置的服务器。如果速度不太满意,就一次性开几台不同的服务器位置的服务器,然后按照同样的方法来进行搭建并测试,选择最优的,之后把其它的服务器删掉,按小时计费测试成本可以忽略。
为了配合v2ray一键搭建脚本,vps操作系统推荐选择Debian 8,其它支持系统有Debian 7、Ubuntu 14、Ubuntu 16、CentOS 7。(注意:不支持centos 6系统!centos 6是ss/ssr搭建教程的推荐系统,但centos 6不支持v2ray一键搭建脚本!)
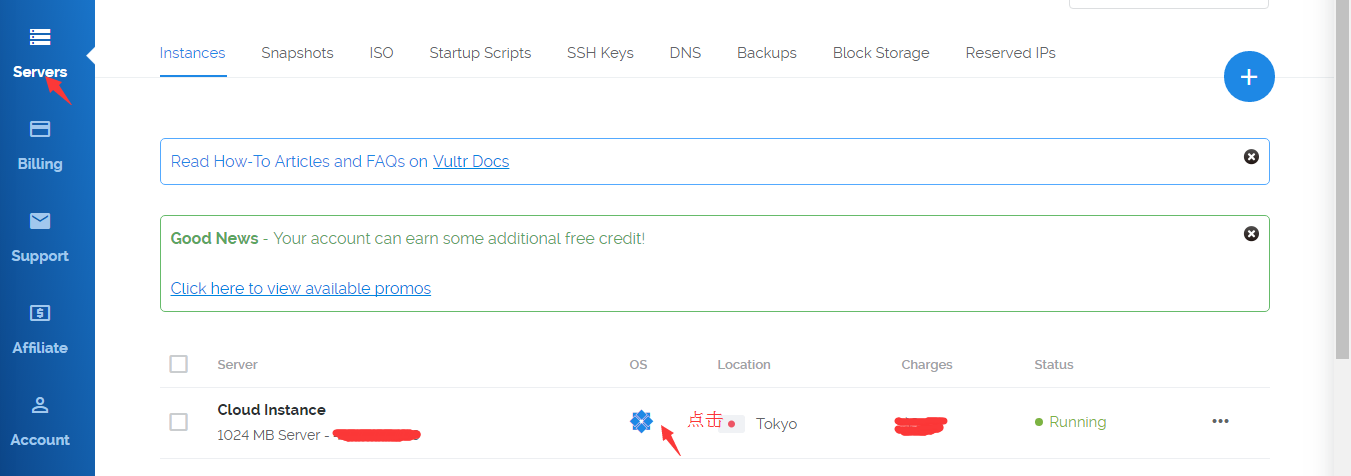
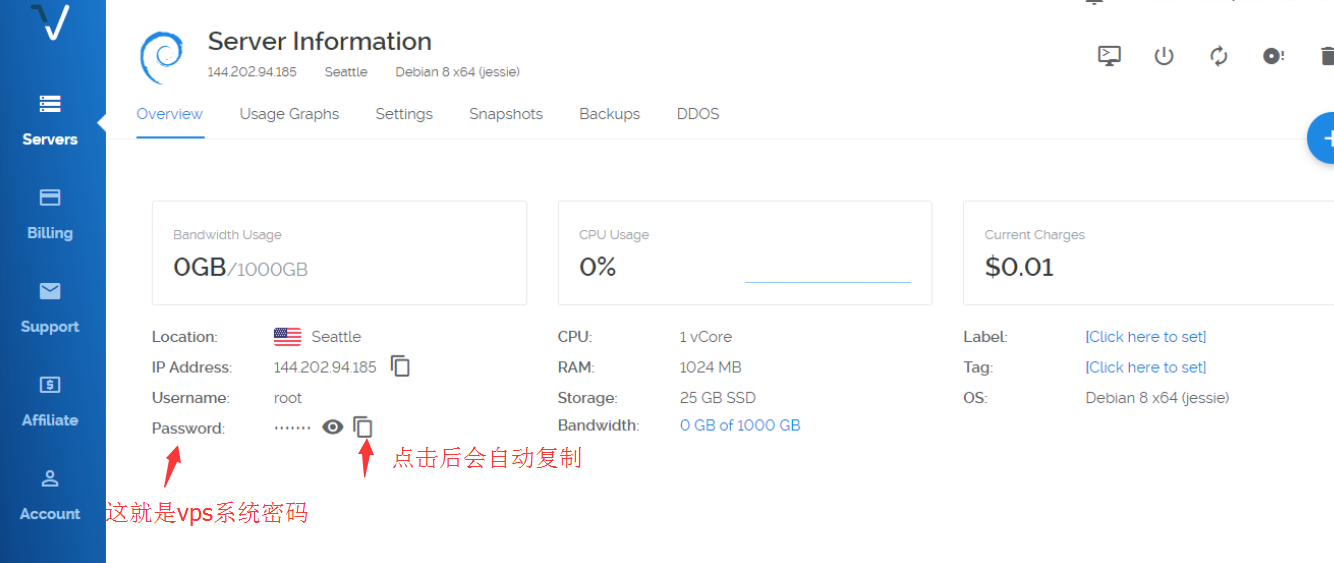
开通服务器时,当出现了ip,不要立马去ping或者用xshell去连接,再等5分钟之后,有个缓冲时间。完成购买后,找到系统的密码记下来,部署服务器时需要用到。vps系统(推荐Debian 8)的密码获取方法如下图:
删掉服务器步骤如下图:
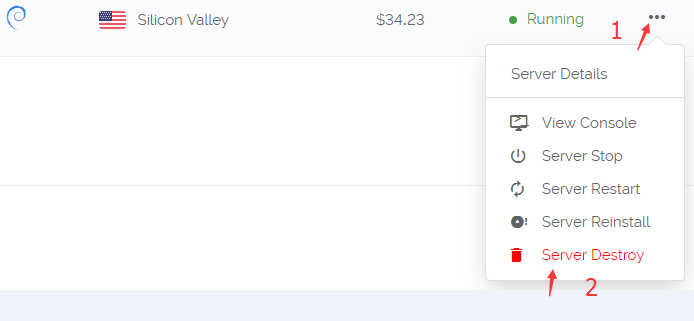
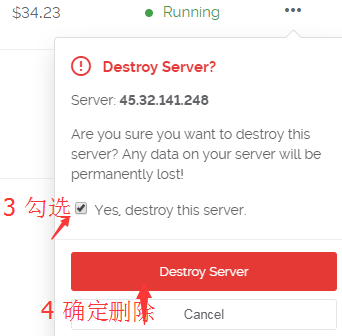
一个被墙ip的vps被删掉后,其ip并不会消失,会随机分配给下一个在这个服务器位置新建服务器的人,这就是为什么开新服务器会有一定几率开到被墙的ip。被墙是指在国内地区无法ping通服务器,但在国外是可以ping通的,vultr是面向全球服务,如果这个被墙ip被国外的人开到了,它是可以被正常使用的,半年或1年后这个被墙的ip可能会被国内防火墙解封,那么这就是一个良性循环。
第二步:部署VPS服务器
购买服务器后,需要部署一下。
如果你是苹果电脑操作系统,更简单,无需下载xshell,系统可以直接连接VPS。打开终端(Terminal),输入ssh root@ip 其中“ip”替换成你VPS的ip, 按回车键,然后复制粘贴密码,按回车键即可登录。粘贴密码时有可能不显示密码,但不影响, 参考设置方法 如果不能用MAC自带的终端连接的话,直接网上搜“MAC连接SSH的软件”,有很多,然后通过软件来连接vps服务器就行.
如果连不上服务器,没有弹出让你输入用户名和密码的输入框,表明你开到的ip是一个被墙的ip,遇到这种情况,重新开新的服务器,直到能连上为止,耐心点哦!如果同一个地区开了多台服务器还是不行的话,可以换其它地区。
连接成功后,就可以复制粘贴代码部署了。
Debian8(推荐)/Debian7/Ubuntu16/Ubuntu14/centos7 v2ray一键部署管理脚本:
安装脚本命令:
apt-get install curl -y
bash -c "$(curl -fsSL https://raw.githubusercontent.com/tracyone/v2ray.fun/master/install.sh)"
卸载脚本命令:
bash -c "$(curl -fsSL https://raw.githubusercontent.com/tracyone/v2ray.fun/master/uninstall.sh)"
———————————————————代码分割线————————————————
复制上面的代码到VPS服务器里,复制代码用鼠标右键的复制,然后在vps里面右键粘贴进去,因为ctrl+c和ctrl+v无效。接着按回车键,脚本会自动安装,以后只需要运行这个快捷命令就可以出现下图的界面进行设置,快捷管理命令为:v2ray

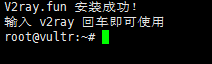
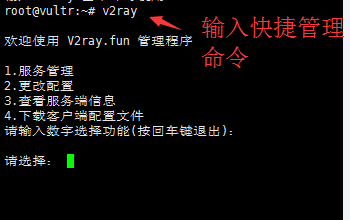
如上图,输入快捷管理命令v2ray后,开始进行v2ray服务端配置。
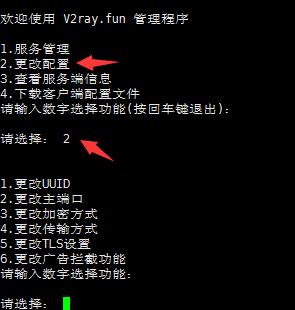
如上图,输入数字2进行更改配置,共有6个子选项,包括:更改UUID、更改主端口、更改加密方式、更改传输方式、更改TLS设置(有域名才行)、更改广告拦截功能。(更改TLS设置和更改广告拦截功能不用设置)
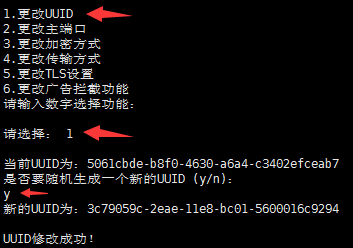
如上图,输入数字1来更改新的UUID号,弹出提示后,输入字母y来确认。
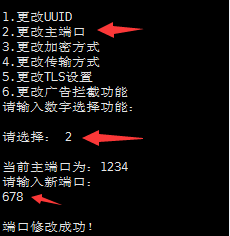
修改UUID号,界面会回到v2ray主界面,重新输入2进入更改配置选项,在输入数字2来更改主端口,主端口范围40~65535,理论上可以任意设置,但不要以0开头!
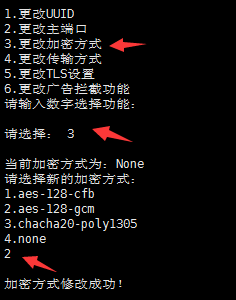
重新进入更改配置选项,输入数字3来更改加密方式,加密方式有4种,最后1种为不加密。
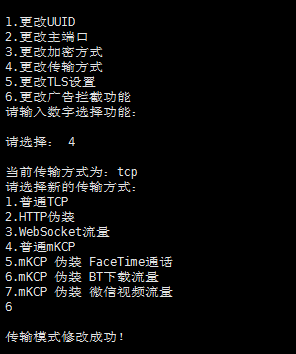
接着,进行传输方式的设置,传输方式共有7种,这个配置对v2ray的速度起着很大的作用,具体哪个最适合你那里的网络环境,需要你自己来尝试。
注意:普通TCP、普通mKCP、mKCP伪装FaceTime通话、mKCP伪装BT下载流量、mKCP伪装微信视频流量可直接设置、不需要域名,HTTP伪装和WebSocket流量需要你有域名,且域名绑定了你的vps服务器ip。
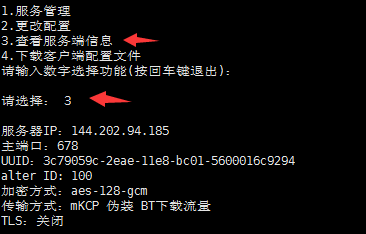
进行了更改配置的设置后,输入数字3可以查看自己设置的v2ray信息。
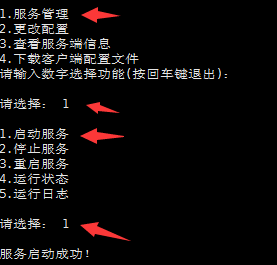
最后一步很关键,那就是启动服务,进入主界面后,输入数字1,然后输入1启动v2ray服务。以后,每次你更改配置或重启vps服务器后都要进行启动服务,请牢记!

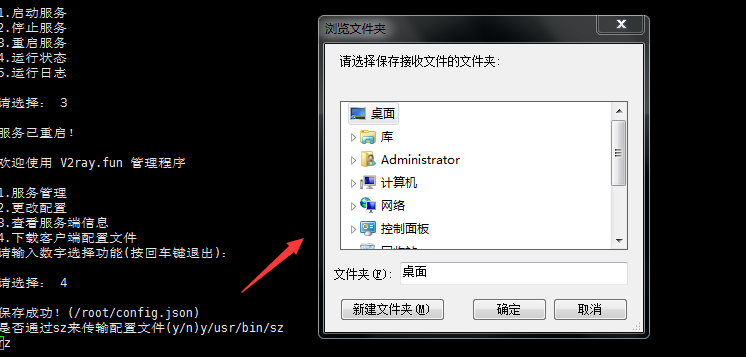
采用xshell软件,可以很方便的将配置文件导出,方便配置v2ray客户端。选择数字4,出现提示后,输入字母y,选择电脑路径即可。
如果你没有用xshell软件,那么无法使用脚本的文件导出功能。vps服务器里面的config.json配置文件存放路径为 /etc/v2ray/config.json MAC电脑用户可以用WinSCP MAC版连接vps服务器,然后根据路径把config.json文件复制出来。
下面这个config.jason文件就是我们刚刚配置的v2ray文件,如果以后更改了v2ray服务端信息,那么你需要重新导出config.jason文件。
因为一键搭建v2ray脚本是一个循环脚本,当你配置结束后不会自动退出快捷管理命令,如果你想退出界面进行其它操作,可以同时按下键盘上的ctrl键和字母z键。
需要注意的是:不管是重启服务器,还是以后想修改之前vps里面的v2ray配置信息,当你重启好服务器或者修改好了v2ray配置信息后,都需要启动v2ray服务端。方式是:输入v2ray,选择1,然后选择1(启动服务)。
【v2ray客户端下载】
FROM
-------------
V2Ray 配置指南
使用Heroku搭建免费YouTube代理
只需简单几步即可在Heroku.com空间上,搭建免费的YouTube代理。
相对于YouTube官方网站,优点在于提供了下载视频的功能。
在线体验:
https://the-youtube.herokuapp.com/
一键在Heroku上部署免费Youtube代理.
在线试用: https://youtube-007.herokuapp.com
一键部署,请点击下方的"Deploy to Heroku"按钮
部署时需要指定Google API KEY, 申请步骤请参考 https://you2php.github.io/doc/ 。若您无法申请到KEY, 可以使用部署向导中的默认值, 但由于Google API 使用有配额限制,当使用量超过配额时,代理将无法正常工作.
当观看某些视频遇到“The media could not be loaded”的错误提示时, 请尝试刷新浏览器或使用其它浏览器观看.
from GitHub - gfw-breaker/you2php-heroku: 一键在Heroku上部署免费Youtube代理